# Challenge 0: Prerequisites
To be able to follow all the challenges provided in this workshop, you need a few prerequisites on your machine. This challenge is for setting up your system before the workshop day.
# Table Of Contents
# Git Version Control
The repository is located at GitHub, so - obviously - we'll need a local Git client to interact with the repository. Download and install the appropriate version of Git for you here: https://git-scm.com/download (opens new window)
# Azure CLI
We will be using the Azure command line interface to create and interact with resources running in Azure.
Click to expand!
To install it, go to https://docs.microsoft.com/cli/azure/install-azure-cli?view=azure-cli-latest (opens new window) and choose your platform.
When finished, login to your Azure account from the command line:
$ az login
You have logged in. Now let us find all the subscriptions to which you have access...
A browser window will open, login to Azure and go back to the command prompt. Your active subscription will be shown as JSON, e.g.:
{
  "cloudName": "AzureCloud",
  "id": "xxxxxxxx-xxxx-xxxx-xxxx-xxxxxxxxxxxx",
  "isDefault": false,
  "name": "Your Subscription Name",
  "state": "Enabled",
  "tenantId": "xxxxxxxx-xxxx-xxxx-xxxx-xxxxxxxxxxxx",
  "user": {
    "name": "xxx@example.com",
    "type": "user"
  }
}
If you have multiple subscriptions, make sure your are working with the correct one!
$ az account show
{
  "cloudName": "AzureCloud",
  "id": "xxxxxxxx-xxxx-xxxx-xxxx-xxxxxxxxxxxx",
  "isDefault": false,
  "name": "Your Subscription Name",
  "state": "Enabled",
  "tenantId": "xxxxxxxx-xxxx-xxxx-xxxx-xxxxxxxxxxxx",
  "user": {
    "name": "xxx@example.com",
    "type": "user"
  }
}
If that is not the correct one, follow these steps below:
$ az account list -o table
[the list of available subscriptions is printed]

$ az account set -s <SUBSCRIPTIONID_YOU_WANT_TO_USE>
# WSL 2
If you are running Windows 10 or Windows 11 you can install a Linux distribution by using the Windows Subsystem for Linux. This way you can use Linux tools and still be completely integrated with your Windows tools. While this is optional if you are going to use Docker Desktop today we highly recommend it. If you cannot use Docker Desktop you need to be either working on Linux or install the WSL2. Follow this link (opens new window) to install the WSL 2.
# Docker
It's obvious that it's expected you to have Docker installed on your computer. But the installation process is not as seamless as it could be. Docker publishes different packages for different operating systems. Please follow the section of your operating system below and install related Docker package published for your operating system.
If you can't install any software on your computer due to company policies or other reasons, please spin up an Ubuntu VM on Azure and follow the Linux section below If you cannot install Docker Desktop install the docker engine in the WSL2. Follow the WSL2 description below.
# WSL2
Docker Desktop is really convenient and specifically on Windows it is extraordinary helpfull and easy to use. But it has drawbacks - it is quite greedy when it comes to memory. We still recommend using Docker Desktop, but if not possible here is a way to install the Docker engine in your WSL. We are expecting that you went with Debian or Ubuntu as Linux distribution.
Click to expand!
- First of all make sure you are a non-root user with admin access.
- ```whoami``` should return your username. If you already have a user switch to it using ```su username```. If you need to create a user do so by typing ```sudo adduser username```. Make sure to remember the password.
- If you can use the ```sudo``` commands you have the admin rights (try ```sudo -v```). If this throws an error make sure you are in root and add the user to the admin group by typing ```usermod -aG sudo username```. Now again switch to your user ```sudo username``` and than try ```sudo -v``` again. If you still get an error look at these more detailed [instructions](https://dev.to/bowmanjd/install-docker-on-windows-wsl-without-docker-desktop-34m9).
- As always with Linux make sure everything is up to date before we make any changes
sudo apt update && sudo apt upgrade. - Now let's install the dependencies needed by typing
sudo apt install --no-install-recommends apt-transport-https ca-certificates curl gnupg2 update-alternatives --config iptablesselect iptables-legacy. /etc/os-releasecurl -fsSL https://download.docker.com/linux/ubuntu/gpg | sudo tee /etc/apt/trusted.gpg.d/docker.ascyou might need to replace ubuntu here with debian if you chose that distribution.echo "deb [arch=amd64] https://download.docker.com/linux/ubuntu focal stable" | sudo tee /etc/apt/sources.list.d/docker.listagain you might need to replace ubuntu here with debian if you chose that distribution. Also "focal" here is the code name for the specific distribution version - in this case "ubuntu 20.04 LTS". Entercat /etc/*-releaseto get the details of your distribution. There you will find "DISTRIB_CODENAME=focal" for example. Replace the version code in the command if you have a different "DISTRIB_CODENAME".sudo apt update- Now we can install Docker by typing
sudo apt install docker-ce docker-ce-cli containerd.io usermod -aG docker usernameallows your user to use docker commands.- Start the Docker Daemon in your WSL2 window.
sudo dockerwill show if docker is installed.sudo dockerdwill start the Daemon. Whenever you want to work with Docker make sure that the Docker Daemon is up and running. - Now that the Daemon is running open another WSL2 terminal. Make sure you are the user there by typing
whoamiif this returns root you need to sitch to your user like this:su username. - Try to run a Docker image to see if everything is set up correctly. Enter
docker run --rm hello-world. This should return something like this:
...
Hello from Docker!
This message shows that your installation appears to be working correctly.
...
Congrats you are all set up with Docker. Be sure to start the Docker Daemon in a seperate WSL2 terminal whenever you want to work with Docker by entering the command sudo dockerd. For now you can exit it by writing exit and hitting Enter.
# Mac Os
Docker Desktop for Mac is available for macOS 10.13 or newer: i.e. High Sierra (10.13), Mojave (10.14) or Catalina (10.15). Mac hardware must be a 2010 or a newer model.
Click to expand!
Installation
- Visit "Docker Desktop for Mac" section of the Docker Hub --> https://hub.docker.com/editions/community/docker-ce-desktop-mac/ (opens new window)
- Click Get Docker link on the right side of the page and download Docker.dmg file
- Double-click Docker.dmg to start the install process.
- When the installation completes and Docker starts, the whale in the top status bar shows that Docker is running, and accessible from a terminal.

- After the installation, check if everything works as expected. Open your favourite terminal application and execute the docker version and docker run hello-world commands. If you get the similar outputs as below, it means that your docker installation has been successfully completed.
$ docker version
Client: Docker Engine - Community
 Version:           ...
$ docker run hello-world

Hello from Docker!
This message shows that your installation appears to be working correctly.

...
# Windows 11
Docker Desktop for Windows is available for Windows 10 and 11 64-bit Home, Pro, Enterprise and Education. Docker Desktop for Windows either uses Windows-native Hyper-V virtualization and networking or the WSL 2 backend. We recommend the WSL 2 for your developer machine in general. See the installation instructions above.
Click to expand!
Installation
- Visit "Docker Desktop on Windows" section of the Docker Hub --> https://docs.docker.com/desktop/install/windows-install/ (opens new window)
- Make sure your machine is set up correctly for using either the WSL 2 backend (recommended) or the Hyper-V backend.
- Click the Docker Desktop for Windows link and download the Docker Desktop Installer.exe file
- Double-click Docker Desktop Installer.exe to run the installer.
- When the installation finishes, Docker starts automatically. The whale
 in the notification area indicates that Docker is running, and accessible from a terminal.
 - After the installation, check if everything works as expected. Open your Windows Powershell terminal application and execute the docker version and docker run hello-world commands. If you get the similar outputs as below, it means that your docker installation has been successfully completed.
> docker version
Client: Docker Engine - Community
 Version:           ...
> docker run hello-world

Hello from Docker!
This message shows that your installation appears to be working correctly.

...
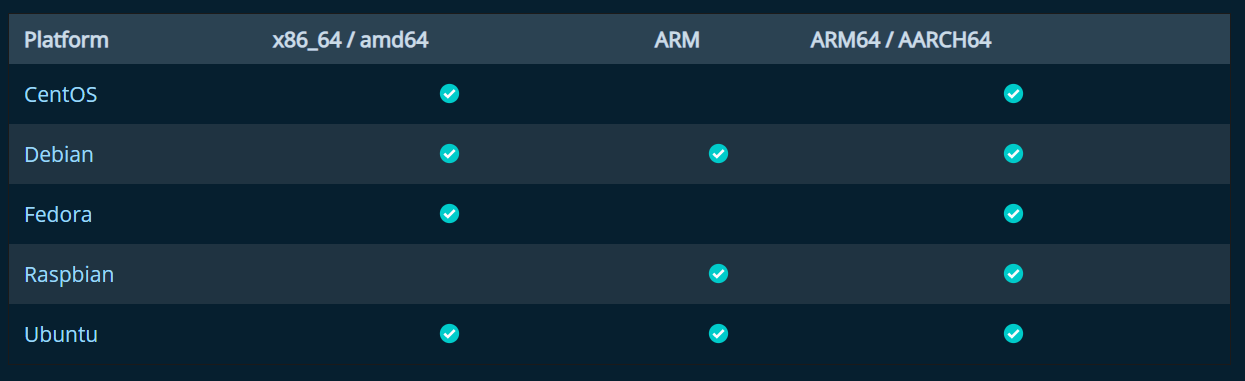
# Linux
Docker Engine is available on a variety of Linux platforms as a static binary installation. Docker provides .deb and .rpm packages from the following Linux distributions and architectures:
Click to expand!
Installation
Follow the instructions below to install Docker on your distro:
- https://docs.docker.com/engine/install/centos/
- https://docs.docker.com/engine/install/debian/
- https://docs.docker.com/engine/install/fedora/
- https://docs.docker.com/engine/install/ubuntu/
Ubuntu:
Open your terminal application and execute the following commands.
- Older versions of Docker were called docker, docker.io, or docker-engine. If these are installed, uninstall them:
$ sudo apt-get remove docker docker-engine docker.io containerd runc
- Download and run the installation script.
$ curl -fsSL https://get.docker.com -o get-docker.sh
$ sudo sh get-docker.sh
- If you would like to use Docker as a non-root user, you should now consider adding your user to the “docker” group with something like:
$ sudo usermod -aG docker your-user
- After the installation, check if everything works as expected. On the terminal, execute the docker version and docker run hello-world commands. If you get the similar outputs as below, it means that your docker installation has been successfully completed.
$ docker version
Client: Docker Engine - Community
 Version:           ...
$ docker run hello-world

Hello from Docker!
This message shows that your installation appears to be working correctly.

...
# Docker Hub
If you didn't sign up yet, we recommend you to sign up and create your Docker ID. This will allow you to create public and private repositories to store your own Docker Images.
- Visit https://hub.docker.com/ (opens new window) and fill the form, click Sign Up button and create your Docker ID.
- Check your mailbox and confirm your account creation.
# Visual Studio Code
To work with all the samples provided in this workshop, you will need an IDE. To target a wide range of developers/architects, we will be using Visual Studio Code as it runs cross-platform.
Therefore, go to https://code.visualstudio.com/docs/setup/setup-overview (opens new window) and install it on your machine.
# Useful Extensions
After the setup is complete, open "Visual Studio" and open the "Extensions" sidebar:

Search and install the following extension:
- Docker for Visual Studio Code https://marketplace.visualstudio.com/items?itemName=ms-azuretools.vscode-docker (opens new window)