# Challenge 2: Cloud Shell - Coding Your Azure Resources
# Here is what you will learn 🎯
- Use the Cloud Shell as launch point for PowerShell and Bash scripts.
- Use Cloud Shell to automate Azure resource creation and configuration.
# Table Of Contents
# Benefits of the Azure Cloud Shell
Ok - quite impressive what the Azure portal as a single page application allows us to do, isn't it?
However sometimes a shell is faster and better for repetitive tasks. But you may not want to install software nor tools for this in your machine.
The Azure Cloud Shell is a shell | console hosted in your browser window, ready to execute commands to create, delete, modify Azure resources in your subscription.
While it is also possible to use PowerShell on your local PC to administer Azure, using the Cloud Shell brings some advantages compared to using your PC.
Using the Cloud Shell saves you time as:
- you do not need to explicitly code the Azure logon within the script - you are already authenticated to Azure via the browser
- you do not need anything to be installed on your PC. So no more asking which version of PowerShell and what modules (opens new window) are necessary
# Create an Azure Cloud Shell
[Azure Portal]
-> Click the 'Cloud Shell' symbol close to your login details on the right upper corner.

The Azure Cloud Shell is an in-browser-accessible shell for managing Azure resources.
It already has the required SDKs and tools installed to interact with Azure.
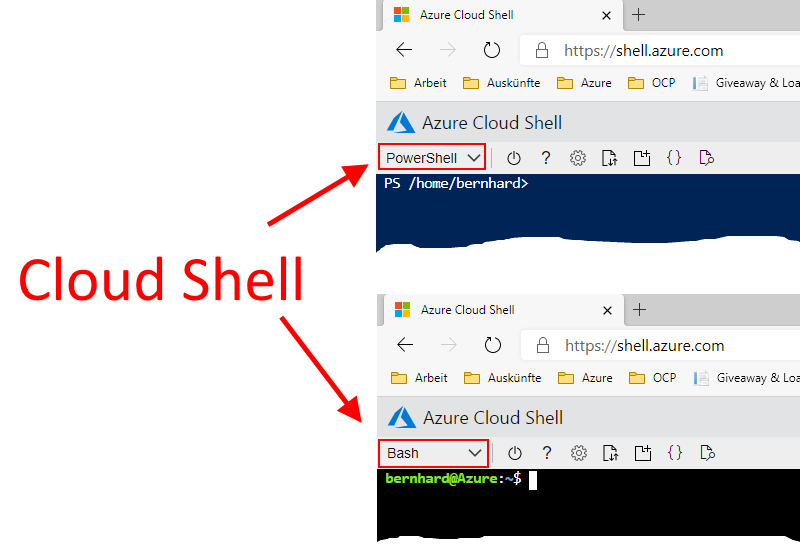
The Azure Cloud Shell comes in 2 flavors: PowerShell or Bash. When being asked choose PowerShell this time.
The first time you use the 'Cloud Shell' you will be asked to setup a storage account e.g. to store files you have uploaded persistently. See (opens new window)
[Azure Portal] -> Click 'Show advanced settings'
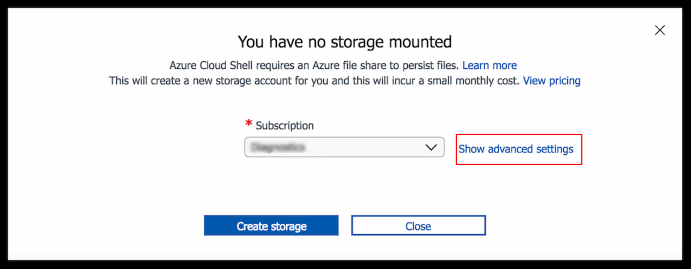
| Name | Value |
|---|---|
| Subscription | %your subscription% |
| Cloud Shell Region | e.g. West Europe |
| Resource Group | e.g. rg-cloudshell |
| Storage Account | %some unique value% |
| File Share | cloudshell |
[Azure Portal] -> Create storage
Once successful your shell should appear at the bottom of the page:
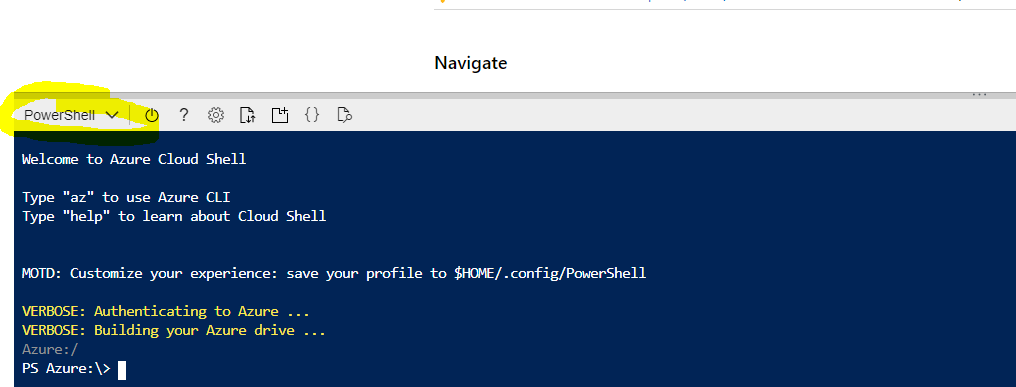
# Playing with the Cloud Shell
Execute your first commands. Using 'PowerShell' as environment you can either call:
Azure CLI code snippets, go execute:
az account showor execute Azure PowerShell commands, like:
Get-AzSubscription
TIP
📝 Most Azure documentation offers script snippets shows both ways. My 2cts:
- az commands tend to be shorter
- PowerShell (as .NET based scripting language) gives you more flexibility when scripts get longer.
WARNING
Note that Azure uses PowerShell Core on a Linux OS for PowerShell. You can check this via:
$psversiontable
should return something like:
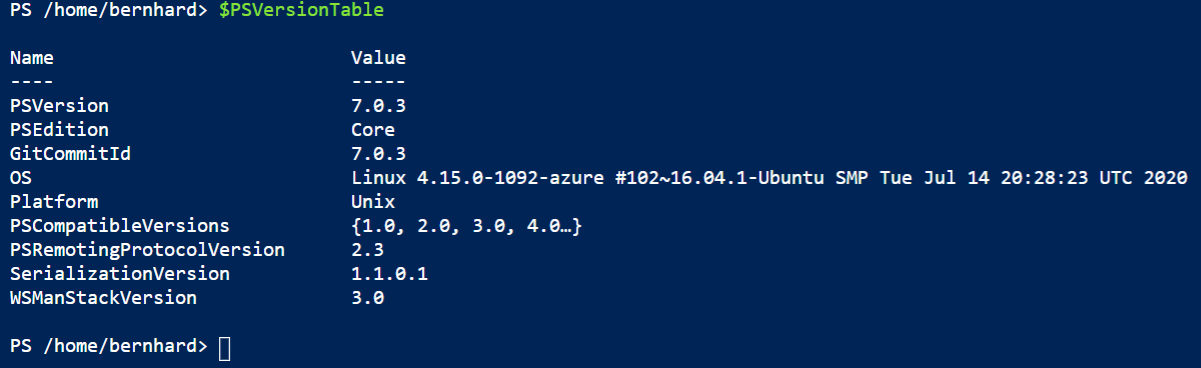
Hence, when you copy and pasted non PowerShell Core scripts, they may need some treatment before you can execute them
Let's query e.g. the available VM sizes in a specific region:
Get-AzVMSize -Location 'west europe'Output should be something like this:
Name                   NumberOfCores MemoryInMB MaxDataDiskCount OSDiskSizeInMB ResourceDiskSizeInMB
----                   ------------- ---------- ---------------- -------------- --------------------
Standard_A0                        1        768                1        1047552                20480
Standard_A1                        1       1792                2        1047552                71680
Standard_A2                        2       3584                4        1047552               138240
Standard_A3                        4       7168                8        1047552               291840
.
.
.
List your Azure resources by executing:
Get-AzResource
TIP
📝 Ok. So there are PowerShell commands (so-called cmdlets using the format <action>-<target> like New-ResourceGroup) to administer azure. In the Azure Cloud Shell they are 'pre'-installed for you. If you would want to run them from your PC you would need to install them (Install-Module Az) & update them (Update-Module Az*) on a regular basis. In PowerShell cmdlets are grouped into modules. If you want to find out which modules are installed - try Get-Module az* -ListAvailable. There is not a single Azure module. Instead the Azure services have their own modules - i.e. there is a module that hosts cmdlets for treating virtual machines, one for networking, etc.
# PowerShell Az Modules for Azure
To query the specific modules for Azure administration, go execute:
Get-Module az* -ListAvailableto list the pre-installed Az modules, go execute :
Directory: C:\Program Files\WindowsPowerShell\Modules

    Directory: /usr/local/share/powershell/Modules

ModuleType Version    PreRelease Name                                PSEdition ExportedCommands
---------- -------    ---------- ----                                --------- ----------------
Script     4.6.1                 Az                                  Core,Desk
Script     1.9.3                 Az.Accounts                         Core,Desk {Disable-AzDataCollection, Disable-AzContextAutosave, Enable-AzDataCollection, Enable-AzCon…
Script     1.1.1                 Az.Advisor                          Core,Desk {Get-AzAdvisorRecommendation, Enable-AzAdvisorRecommendation, Disable-AzAdvisorRecommendati…
Script     1.2.0                 Az.Aks                              Core,Desk {Get-AzAksCluster, New-AzAksCluster, Remove-AzAksCluster, Import-AzAksCredential…}
Script     1.1.4                 Az.AnalysisServices                 Core,Desk {Resume-AzAnalysisServicesServer, Suspend-AzAnalysisServicesServer, Get-AzAnalysisServicesS…
Script     2.1.0                 Az.ApiManagement                    Core,Desk {Add-AzApiManagementApiToGateway, Add-AzApiManagementApiToProduct, Add-AzApiManagementProdu…
Script     1.1.0                 Az.ApplicationInsights              Core,Desk {Get-AzApplicationInsights, New-AzApplicationInsights, Remove-AzApplicationInsights, Update…
Script     1.4.0                 Az.Automation                       Core,Desk {Get-AzAutomationHybridWorkerGroup, Remove-AzAutomationHybridWorkerGroup, Get-AzAutomationJ…
Script     3.1.0                 Az.Batch                            Core,Desk {Remove-AzBatchAccount, Get-AzBatchAccount, Get-AzBatchAccountKey, New-AzBatchAccount…}
Script     1.0.3                 Az.Billing                          Core,Desk {Get-AzBillingInvoice, Get-AzBillingPeriod, Get-AzEnrollmentAccount, Get-AzConsumptionBudge…
Script     1.4.3                 Az.Cdn                              Core,Desk {Get-AzCdnProfile, Get-AzCdnProfileSsoUrl, New-AzCdnProfile, Remove-AzCdnProfile…}
.
.
.
To find out which module hosts which cmdlet (e.g. Get-AzVMSize), type something like:
get-command *vmsize*Result similar to:
CommandType     Name                                               Version    Source
-----------     ----                                               -------    ------
Alias           Get-AzureRmVMSize
Cmdlet          Get-AzDtlAllowedVMSizesPolicy                      1.0.2      Az.DevTestLabs
Cmdlet          Get-AzVMSize                                       4.3.1      Az.Compute
Cmdlet          Set-AzDtlAllowedVMSizesPolicy                      1.0.2      Az.DevTestLabs
To find out all commands hosted in the Az.Compute module type:
Get-Command -Module Az.Computedelivers e.g.:
CommandType     Name                                               Version    Source
-----------     ----                                               -------    ------
.
.
.
Cmdlet          New-AzSnapshotUpdateConfig                         4.3.1      Az.Compute
Cmdlet          New-AzVM                                           4.3.1      Az.Compute
Cmdlet          New-AzVMConfig                                     4.3.1      Az.Compute
Cmdlet          New-AzVMDataDisk                                   4.3.1      Az.Compute
Cmdlet          New-AzVMSqlServerAutoBackupConfig                  4.3.1      Az.Compute
Cmdlet          New-AzVMSqlServerAutoPatchingConfig                4.3.1      Az.Compute
Cmdlet          New-AzVMSqlServerKeyVaultCredentialConfig          4.3.1      Az.Compute
.
.
.
To learn more about a specific cmdlet. You can e.g. execute:
help New-AzVM -examples
# Create a VM with PowerShell (optional)
Now let's create a VM using PowerShell. Execute:
help New-AzVM -onlineThis should open a new browser tab with online help for
New-AzVM. Examine the explanation and look at the code samples.Note: This command may fail when executed in the Azure Cloud Shell and ask you to copy the URL manually into a new tab.
Try creating a simple VM by executing:
$VMName = 'MyVM'    # variable for easy reuse
New-AzVM -Name $VMName -Credential (Get-Credential) -Location 'North Europe'
Enter a user name (not 'admin' nor 'administrator') and a complex password when asked.

After a successful run you should have a VM in your subscription:
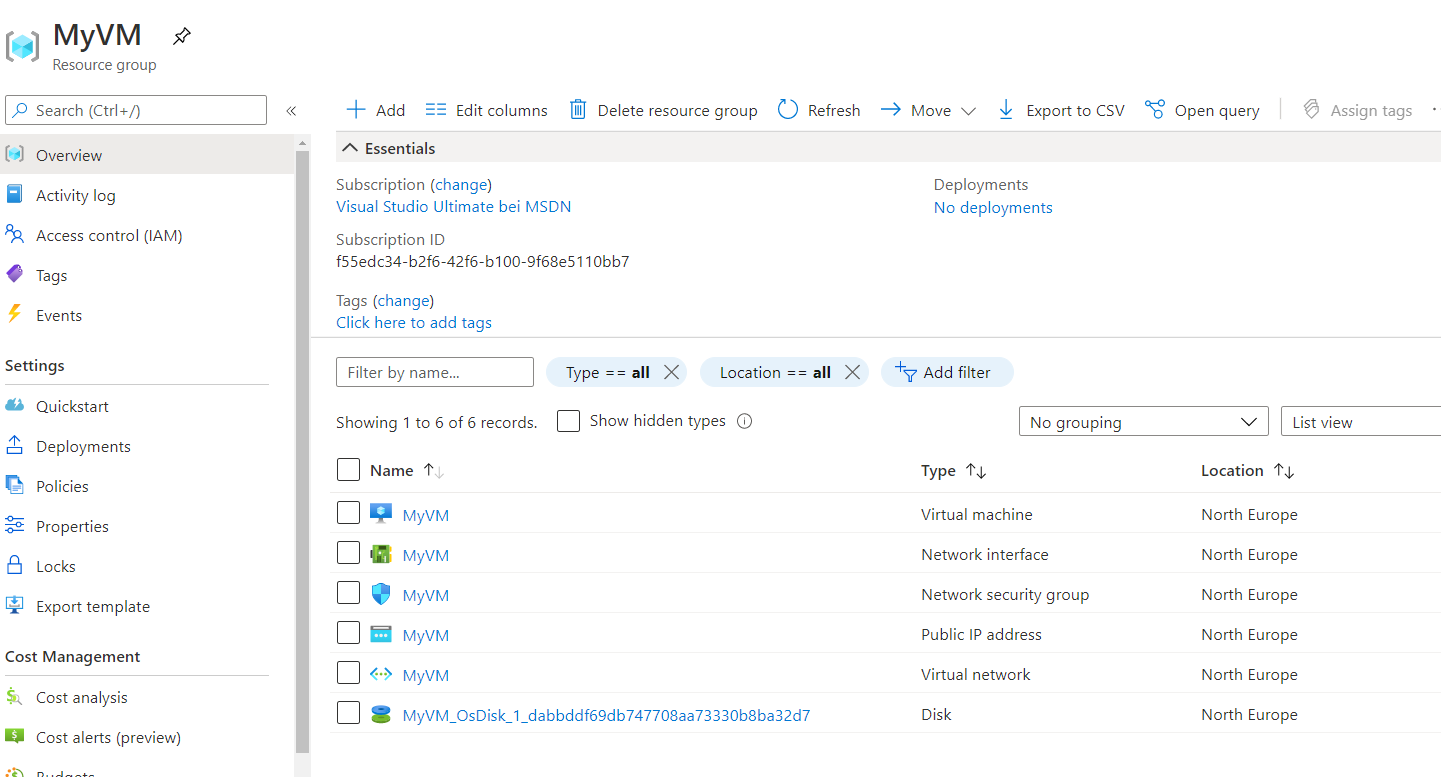
Note:
Creating a vm is not that easy. We did not specify a network, vm size, operating system, etc. As a result, a lot of defaults are assumed. If you want to script this the code gets much longer.
Take a look at some examples by executing:
help new-azvm -examples
the output will be something like:
.
.
.
  Example 3: Create a VM from a marketplace image without a Public IP

  $VMLocalAdminUser = "LocalAdminUser"
  $VMLocalAdminSecurePassword = ConvertTo-SecureString <password> -AsPlainText -Force
  $LocationName = "westus"
  $ResourceGroupName = "MyResourceGroup"
  $ComputerName = "MyVM"
  $VMName = "MyVM"
  $VMSize = "Standard_DS3"

  $NetworkName = "MyNet"
  $NICName = "MyNIC"
  $SubnetName = "MySubnet"
  $SubnetAddressPrefix = "10.0.0.0/24"
  $VnetAddressPrefix = "10.0.0.0/16"

  $SingleSubnet = New-AzVirtualNetworkSubnetConfig -Name $SubnetName -AddressPrefix $SubnetAddressPrefix
  $Vnet = New-AzVirtualNetwork -Name $NetworkName -ResourceGroupName $ResourceGroupName -Location $LocationName -AddressPrefix $VnetAddressPrefix -Subnet $SingleSubnet
  $NIC = New-AzNetworkInterface -Name $NICName -ResourceGroupName $ResourceGroupName -Location $LocationName -SubnetId $Vnet.Subnets[0].Id

  $Credential = New-Object System.Management.Automation.PSCredential ($VMLocalAdminUser, $VMLocalAdminSecurePassword);

  $VirtualMachine = New-AzVMConfig -VMName $VMName -VMSize $VMSize
  $VirtualMachine = Set-AzVMOperatingSystem -VM $VirtualMachine -Windows -ComputerName $ComputerName -Credential $Credential -ProvisionVMAgent -EnableAutoUpdate
  $VirtualMachine = Add-AzVMNetworkInterface -VM $VirtualMachine -Id $NIC.Id
  $VirtualMachine = Set-AzVMSourceImage -VM $VirtualMachine -PublisherName 'MicrosoftWindowsServer' -Offer 'WindowsServer' -Skus '2012-R2-Datacenter' -Version latest

  New-AzVM -ResourceGroupName $ResourceGroupName -Location $LocationName -VM $VirtualMachine -Verbose
As you can see this is much more code - even more if you enrich it with error handling.
# Cleanup
Cleanup by deleting the resource group with the VM using the portal or via executing:
Remove-AzResourceGroup $VMName -Force -AsJob # -AsJob will execute this operation in the background
TIP
📝In case of an error try to restart the cloud shell as it times out.